
at home
US /æt hom/
UK /æt həum/
- Phrase
- In one's own residence or country.
- Adjective
- Feeling comfortable and relaxed.
at times
US /æt taɪmz/
UK /æt taɪmz/
- Phrase
- Sometimes; occasionally.
A1Morebatch
US /bætʃ/
UK /bætʃ/
- Countable Noun
- Amount of something that is produced at one time
- A group of things made or done together
- Transitive Verb
- To combine or arrange together into a group
B2Moreblock
US /blɑk/
UK /blɒk/
- Noun (Countable/Uncountable)
- Solid piece of material used for building
- A piece of wood, chocolate etc.
- Transitive Verb
- To stop from going forward or making progress
- To obstruct or prevent the movement or passage of.
A2Morebroth
US /brɔθ, brɑθ/
UK /brɒθ/
- Uncountable Noun
- Liquid or soup that meat, etc. has been cooked in
B2Morecheck out
US /tʃɛk aʊt/
UK /tʃek aut/
- Phrase
- Phrasal Verb
- To find out information about something
- To take books out of a library
A1Moreclarify
US /ˈklærəˌfaɪ/
UK /'klærəfaɪ/
- Transitive Verb
- To make a liquid become clear or pure
- To state again so that a point is clearer
B1Moreconcentrate
US /ˈkɑnsənˌtret/
UK /'kɒnsntreɪt/
- Verb (Transitive/Intransitive)
- To cause to be present in large amount or number
- To pay great attention to a task; focus
- Noun (Countable/Uncountable)
- A substance made by removing water or other diluents; a concentrated form of something.
A2Morecondense
US /kənˈdɛns/
UK /kənˈdens/
- Verb (Transitive/Intransitive)
- To remove water from to make it thicker
- To shorten (a book, etc.) by removing part of it
B2TOEICMoreconvenient
US /kənˈvinjənt/
UK /kənˈvi:niənt/
- Adjective
- Allowing you to do something with less trouble
A2Moredry out
US
UK
- Verb (Transitive/Intransitive)
- To remove moisture from something; to become completely dry.
- To detoxify and recover from addiction.
A1Moreend up with
US
UK
- Phrasal Verb
- To have something as a result.
A1Moreessence
US /ˈɛsəns/
UK /'esns/
- Uncountable Noun
- Most important part or quality of something
- Substance that has a very strong, unique smell
B1TOEICMoreexcellent
US /ˈɛksələnt/
UK /ˈeksələnt/
- Adjective
- Extremely good
- Very skilled; having great ability.
A2TOEICMorefilter
US /ˈfɪltɚ/
UK /'fɪltə(r)/
- Noun (Countable/Uncountable)
- Device to remove certain types of light, sound
- Device to remove unwanted things from liquid, gas
- Transitive Verb
- To remove certain types of light, sound
- To remove unwanted substances from a liquid or gas
B1Moreflavor
US /ˈflevɚ/
UK /'fleɪvə/
- Noun (Countable/Uncountable)
- Quality giving something a particular character
- Taste of something, especially in food or drink
- Transitive Verb
- To add extra taste to a food
B1Moreflip
US /flɪp/
UK /flɪp/
- Verb (Transitive/Intransitive)
- To turn your body in the air, as in gymnastics
- To move into a different position quickly
- Noun
- Act of turning your body in the air; somersault
- Movement of something from one position to another
B2Morefood source
US
UK
- Noun
- A place or thing from which food is obtained.
B2Moregel
US /dʒɛl/
UK /dʒel/
- Noun (Countable/Uncountable)
- Thick substance, similar to jelly
- Intransitive Verb
- To adhere or stick together like a gel
B2Moregelatin
US /ˈdʒɛlətn/
UK /'dʒelətɪn/
- Uncountable Noun
- Colorless water-soluble glutinous protein
C2Moreglue
US /ɡlu/
UK /ɡlu:/
- Noun (Countable/Uncountable)
- Sticky substance used for joining things together
- Transitive Verb
- To join or affix things with glue or paste
B1Morego ahead
US /ɡo əˈhɛd/
UK /ɡəu əˈhed/
- Phrasal Verb
- To start an activity; start doing, working etc.
- To give permission to do something
- Intransitive Verb
- To start or proceed with something
- To proceed despite potential obstacles or doubts.
A1Morehave to
US /hæv tu/
UK /ˈhæv tə/
- Auxiliary Verb
- Must do
A1Moreheat
US /hit/
UK /hi:t/
- Uncountable Noun
- State of anger, excitement, or arguing
- Particular temperature at which to cook something
- Transitive Verb
- To make hot or hotter
A2Moreinvalid
US /ˈɪnvəlɪd/
UK /ɪn'vælɪd/
- Adjective
- Having no force; not acceptable
- Not factually or legally valid.
- Noun (Countable/Uncountable)
- A person who is sick or in ill health
- Something that is not valid.
B2Moreliquid
US /ˈlɪkwɪd/
UK /ˈlɪkwɪd/
- Adjective
- (Of wealth) being able to be spent as cash
- In a state of being uncertain
- Noun (Countable/Uncountable)
- Something that is similar to the state of water
- A drink; beverage.
A2Moremedium
US /ˈmidiəm/
UK /'mi:dɪəm/
- Noun
- Method of expressing ideas or feelings
- Something available in a middle size or condition
A2TOEICMoremilitary
US /ˈmɪlɪˌtɛri/
UK /'mɪlətrɪ/
- Noun
- Army or armed forces
- Adjective
- Concerning the army or navy
B1Morepaste
US /pest/
UK /peɪst/
- Transitive Verb
- To move computer data from one page to another
- To stick or glue something to something else
- Noun (Countable/Uncountable)
- Type of thick glue used for sticking things
- Soft, wet mixture of powder and liquid
B1Moreportable
US /ˈpɔ:rtəbl/
UK /ˈpɔ:təbl/
- Adjective
- Light enough to be moved around with ease
- Noun
- A computer etc. that can be moved around easily
B1TOEICMorepoultry
US /ˈpoʊltri/
UK /ˈpəʊltri/
- Noun (Countable/Uncountable)
- Birds such as chickens, ducks, geese etc.
- Uncountable Noun
- The meat of domesticated birds, used as food.
B2Moreprocess
US /ˈprɑsˌɛs, ˈproˌsɛs/
UK /prə'ses/
- Transitive Verb
- To organize and use data in a computer
- To deal with official forms in the way required
- Noun (Countable/Uncountable)
- Dealing with official forms in the way required
- Set of changes that occur slowly and naturally
A2TOEICMorerack
US /ræk/
UK /ræk/
- Noun
- A frame, stand, hook on which things are hung
- Transitive Verb
- To cause someone pain or suffering
B1Morerecipe
US /ˈrɛsəˌpi/
UK /'resəpɪ/
- Noun
- Conditions likely to create a particular result
- Directions for making a dish, with the ingredients
B1Morereduce
US /rɪˈdus, -ˈdjus/
UK /rɪ'dju:s/
- Verb (Transitive/Intransitive)
- To try to decrease, e.g. your weight if overweight
- To boil a liquid until it has decreased in amount
A2TOEICMoreremain
US /rɪˈmen/
UK /rɪˈmeɪn/
- Intransitive Verb
- To be left behind; to continue to exist
- To stay in a place when other people have gone
A2TOEICMorerinse
US /rɪns/
UK /rɪns/
- Transitive Verb
- To wash off small amounts of dirt, soap suds, etc.
- To wash lightly
- Uncountable Noun
- Washing off small amount of dirt, soap suds, etc.
- A form of shampoo or conditioner
B2Moreroaster
US /'roʊstə/
UK /'rəʊstə/
- Countable Noun
- Harsh or humorous critic
B2Moreruin
US /ˈruɪn/
UK /'ru:ɪn/
- Transitive Verb
- To damage or completely destroy something
- To cause someone to lose their money or status
- Noun (Countable/Uncountable)
- Remains of a building that has been destroyed
- The state of being destroyed or severely damaged.
B1Moresettle
US /ˈsɛtl/
UK /'setl/
- Transitive Verb
- To make (a child, etc.) feel calm/ready for sleep
- To complete or finalize e.g. a contract or debt
- Intransitive Verb
- To become accustomed to a new environment
- (Of liquids) to move to the bottom of a container
A2Moresolidify
US /səˈlɪdəˌfaɪ/
UK /səˈlɪdɪfaɪ/
- Verb (Transitive/Intransitive)
- To make or become solid or more solid
B1Moresource
US /sɔrs, sors/
UK /sɔ:s/
- Noun (Countable/Uncountable)
- Piece of information; a person giving information
- Place from which something necessary comes
- Adjective
- Produces or provides what is wanted or needed
A2TOEICMorestiff
US /stɪf/
UK /stɪf/
- Noun
- Slang term for a dead body
- Adjective
- Frozen still due to fear or anger
- Not able to be bent
B1Morestrain
US /stren/
UK /streɪn/
- Transitive Verb
- To remove the water from (food) using a colander
- To injure a muscle, leg etc. by using it too much
- Noun (Countable/Uncountable)
- Injury to a muscle, leg etc. through overuse
- Type or variation of a disease or bacillus
B2Moresubstance
US /ˈsʌbstəns/
UK /'sʌbstəns/
- Uncountable Noun
- Essence of; most basic or central qualities
- Particular type of material
A2Moretaste
US /test/
UK /teɪst/
- Uncountable Noun
- (Good) sense of style in clothes, art, or manners
- Flavor in your mouth from food or drink
- Verb (Transitive/Intransitive)
- To experience something
- To experience the flavor of food, drink
A2TOEICMoretemperature
US /ˈtɛmpərəˌtʃʊr,-tʃɚ,ˈtɛmprə-/
UK /ˈtemprətʃə(r)/
- Noun (Countable/Uncountable)
- When you your body heat is above normal
- How hot or cold something is, e.g. the weather
A2Moreto the point
US /tu ði pɔɪnt/
UK /tu: ðə pɔint/
- Adjective
- Expressing something directly and without unnecessary detail.
- Phrase
- Relevant and pertinent to the matter at hand.
A2Moreturn off
US
UK
- Phrasal Verb
- To make someone feel negatively about something
A1Moreunpleasant
US /ʌnˈplɛzənt/
UK /ʌnˈpleznt/
- Adjective
- Causing a bad feeling in people
- Disagreeable or offensive in behavior or manner.
B1Moreveal
US /vil/
UK /vi:l/
- Uncountable Noun
- Meat from a young cow
C1Morewrap
US /ræp/
UK /ræp/
- Countable Noun
- Piece of clothing worn loosely on the shoulders
- Thin bread filled with food and rolled
- Transitive Verb
- To be or move around something
- To cover something with paper or a cloth e.g. gift
B1More
Vocabulary
- food source: A place or thing from which food is obtained.
- at home: In one's own residence or country.
- go ahead: To start an activity; start doing, working etc.
- turn off
- check out
- at times: Sometimes; occasionally.
- have to: Must do
- end up with: To have something as a result.
- to the point: Expressing something directly and without unnecessary detail.
- dry out: To remove moisture from something; to become completely dry.
- process: To organize and use data in a computer
- period: Set amount of time during which events take place
- flip: To turn your body in the air, as in gymnastics
- completely: In every way or as much as possible
- ruin: To damage or completely destroy something
- wrap: Piece of clothing worn loosely on the shoulders
- strain: To remove the water from (food) using a colander
- recipe: Conditions likely to create a particular result
- substance: Essence of; most basic or central qualities
- concentrate: To cause to be present in large amount or number
- filter: Device to remove certain types of light, sound
- military: Army or armed forces
- similar: Nearly the same; alike
- essence: Most important part or quality of something
- remain: To be left behind; to continue to exist
- settle: To make (a child, etc.) feel calm/ready for sleep
- form: Sports team or person's current winning record
- flavor: Quality giving something a particular character
- stiff: Slang term for a dead body
- broth: Liquid or soup that meat, etc. has been cooked in
- reduce: To try to decrease, e.g. your weight if overweight
- click: To work well with someone or something
- suggest: To mention something that could be done; propose
- source: Piece of information; a person giving information
- stage: To organize an event to gain public interest
- medium: Method of expressing ideas or feelings
- century: Period of 100 years
- block: Solid piece of material used for building
- liquid: (Of wealth) being able to be spent as cash
- rinse: To wash off small amounts of dirt, soap suds, etc.
- batch: Amount of something that is produced at one time
- solidify: To make or become solid or more solid
- temperature: When you your body heat is above normal
- portable: Light enough to be moved around with ease
- taste: (Good) sense of style in clothes, art, or manners
- unpleasant: Causing a bad feeling in people
- point: An item to be discussed
- excellent: Extremely good
- clarify: To make a liquid become clear or pure
- rack: A frame, stand, hook on which things are hung
- turn: To become (a particular age)
- set: Prepared for something; ready
- convenient: Allowing you to do something with less trouble
- heat: State of anger, excitement, or arguing
- poultry: Birds such as chickens, ducks, geese etc.
- include: To make someone, something part of a group
- hard: Difficult to do; difficult to understand
- burn: To destroy with fire
- collagen: Type of protein that is often used in skin cream and in plastic surgery because it makes skin look younger
- condense: To remove water from to make it thicker
- glue: Sticky substance used for joining things together
- paste: To move computer data from one page to another
- gel: Thick substance, similar to jelly
- gelatin: Colorless water-soluble glutinous protein
- invalid: Having no force; not acceptable
- roaster: Harsh or humorous critic
- veal: Meat from a young cow
Get the full experience in the app
Learn anywhere with detailed sentence and usage analysis
01:03
She took a brave step forward, leaving behind her comfort zone to chase her dreams.
Vocabulary
- brave
adj. Having courage
- comfort zone
phr. A familiar situation where one feels safe
Explanation
a brave step is a noun phrase, where brave is an adjective modifying the noun step, meaning "a courageous step".
forward is an adverb modifying step, meaning "ahead".
The whole phrase serves as the object, answering the "what" of took (verb) — she took a brave step forward.
Get the full experience in the app
Look up words anytime with pronunciation, part of speech, and usage
brave
US/brev/
UK/breɪv/
adj.Brave
v.t.To bravely face
A2 Elementary
Get the full experience in the app
Practice speaking anytime and get instant pronunciation feedback
Try this speaking exercise.
Try practicing with this sentence.
80
0
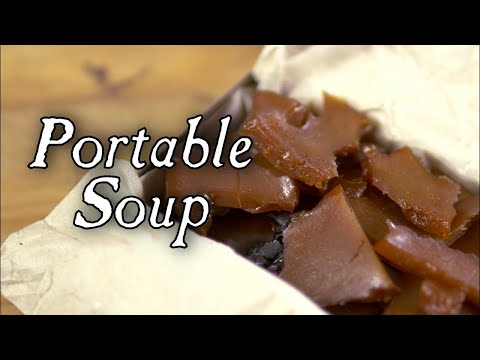
Samuel posted on 2018/11/02Ever wondered how folks kept food fresh centuries ago? This video dives into the fascinating world of 18th-century portable soup, showing you how to make this historical recipe using modern kitchen tools like a slow cooker! You'll pick up practical food preservation vocabulary and get a taste of cultural history, all in one go.
Learn this video on the APP!
The VoiceTube App has more in-depth practice for videos!