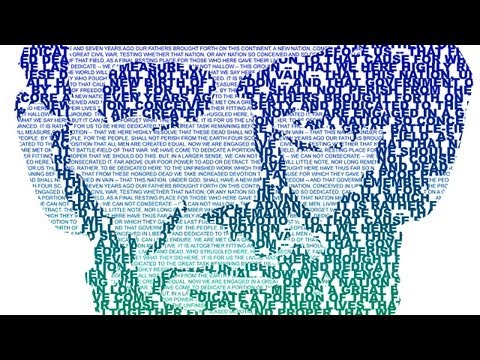
Subtitles section Play video Print subtitles Hi, this is Marty from Blue Lightning TV. Quite a while ago, I did a tutorial showing how to make a portrait out of text. In this tutorial, I'll show you how to do it quicker and better. Including how to make it in color. You can mix fonts and sizes and because they're "live", they're fully editable. Feel free to use any photo you'd like. If you want to use this image, its link is located in the video's description or project files. Its size is approximately, 1300 by 1900 pixels with the resolution of 150 pixels per inch. If you're using a color photo desaturate it by pressing Ctrl + Shift + "u" on a PC or Cmd + Shift + 'u" on a Mac. To make the darkest tones, black and the lightest tones, white... press Ctrll or Cmd + Shift + "L". We need to make a selection around the head and shoulders. For this example, I'll use the Pencil tool. First, click on your quick mask button... and make sure black is your foreground color. If it isn't, click on this small black and white box icon. Open your pencil tool. We'll make the Size... 5 pixels and the Hardness... 100%. Draw around the head and shoulders. It doesn't have to be perfect, especially around the hair. Open your paint bucket tool. Click down inside the portrait to fill it in. Press "Q" to make the quickmask into a selection. Invert it... by pressing Ctrl or Cmd + Shift + "i". Go to Select and Save Selection. Name it, "Highlights"... and click, OK or press Enter or Return. Delete the selection by pressing Ctrl or Cmd + "d". Press Ctrl or Cmd + "j" to make a copy of the original image. Go to Filter... and Filter Gallery. Open the "Artistic" folder... and click "Cutout". Make the number of Levels, 2... the Edge Simplicity, 5... and the Edge Fidelity, 1. Then, click OK. Go to Image...Adjustments...and Threshold. The Threshold is 128. Go to Select and Color Range. Select... Shadows... and click, OK. We'll save the selection and name it, "Shadows". Then, delete the selection. Click on the new layer button to make a new layer. We'll fill it with White...and since white is our background color, press Ctrl or Cmd + Delete. Go to Window... and Character. In the Character panel, choose a font that has at least 2 weights. I'm using, "Arial". For the Highlights of the portrait, I'll use, Arial Regular. The Size is 8 points and the "Leading" is 7 points. "Leading" is the amount of space between the lines of text. Press the "All Caps" icon. This makes the text all caps even if the original text is upper and lower case. Go to the top, left corner... click down... and drag it of the bottom, right corner. This "text box" or "bounding box"... makes the text we place inside this area, conform to the dimensions of the box. If you re-size the bounding box, Photoshop adjusts the wrapped ends of the text to account for the new size. For this example, I'll fill it with Lincoln's "Gettysburg Address". I already searched for it in my browser. When you find the text block you'd like to use in your portrait, highlight it... and press Ctrl or Cmd + "c" to copy it. I'll minimize the browser's window... click down inside the top, left corner of the bounding box and press Ctrl or Cmd + "v"... to paste the text into it. Click on the thumbnail of the text to accept it. Press, "z" to open your Zoom tool. Zoom into your text... and click on your Type tool. Let's make the entire text block into one unbroken paragraph. I'll click to the left of the first character... and press the Backspace key to move it to the left, so it's flush with the bounding box. I'll click to the left of the first character of the second paragraph... and press the Delete key... until the text moves up to meet the first paragraph. Continue until we have one unbroken paragraph. Highlight it... and copy it. Press Ctrl or Cmd + Zero... to see the entire document on your screen. Click to the right of the last character and paste in the text. Continue to paste the text in until all of the bounding box is filled with the text. To get rid of the uneven lines of text on the right, go to the middle, right of the bounding box... and press and hold Ctrl on a PC or Cmd on a Mac. When you see this white pointer, drag it to the right. Then, click on the thumbnail of the text layer to accept it. Let's name it... "Highlights"... and then make a copy of it. Click off the eyeball of the original text to hide it... and we'll name the copy... "Shadows". Double-click on the thumbnail to highlight the text... and change the font to the heaviest weight. Make the size, 12 points... and the Leading, 9 points. Click on the thumbnail to accept it. Open your Channels panel... and Ctrl-click... or Cmd-click on the Shadows thumbnail to make it into a selection. Open back up to you Layers panel... and click on the Layer mask button... to make a layer mask next to the active layer, which is the Shadows text. Make the Highlights text layer, visible... and active. Go back to your Channels panel... and Ctrl-click or Cmd-click on the Highlights thumbnail... to make it into a selection... and then go to the Shadows thumbnail... and press Ctrl+ Alt on a PC or Cmd + Opt on a Mac... to subtract the shape from the Highlights shape... leaving just the highlights of the portrait. Open back up your Layers panel... and click on the layer mask button to make a layer mask next to the highlights text. As I mentioned at the beginning, the text is "live" and editable... so for example, if we want to increase the size of the text in the shadow areas, double-click on the thumbnail of the Shadows text to highlight all the text and type in a higher number. To accept it, click back on the thumbnail. To modify the size of the text in the highlight areas, make the Highlights layer active... and double-click on the thumbnail to highlight all the text. I'll change point size to 6... and click on the thumbnail to accept it. Next, I'll show you how to make your portrait into full color. Make the top layer active... and click on the new layer button to make a new layer. We'll fill it with White... and since White is our foreground color press, Alt or Opt + Delete. Hide the layer... open your Channels panel... and click on the dotted, circular icon at the bottom to select all the tonal values of your image. Open back up your layers panel and make the white layer visible. Invert the selection... by pressing Ctrl + Shift + 'i" on a PC or Cmd + Shift + "i" on a Mac. To hide the selection, press Ctrl or Cmd + "h". Let's fill the selection with gradient colors.