
alert
US /əˈlɚt/
UK /ə'lɜ:t/
- Adjective
- Being aware and able to respond quickly
- Transitive Verb
- To warn someone so they can respond to it
B1TOEICMorealign
US /əˈlaɪn/
UK /əˈlaɪn/
- Transitive Verb
- To arrange (e.g. objects) in line with one another
- Intransitive Verb
- To be in a line or in the correct position in relation to something else.
B2Morealong with
US /əˈlɔŋ wɪð/
UK /əˈlɔŋ wið/
- Preposition
- In addition to; together with.
- Adverb
- In company or together with someone or something.
- Including; in addition to.
A2Moreappliance
US /əˈplaɪəns/
UK /əˈplaɪəns/
- Noun (Countable/Uncountable)
- Device designed to perform common household tasks
B2TOEICMoreassembly
US /əˈsɛmbli/
UK /ə'semblɪ/
- Noun (Countable/Uncountable)
- Process of putting the parts of something together
- Group of people gathered for a purpose
B1TOEICMoreattach
US /əˈtætʃ/
UK /ə'tætʃ/
- Verb (Transitive/Intransitive)
- To be associated or connected with
A2TOEICMoreaware
US /əˈwɛr/
UK /əˈwɛə/
- Adjective
- Knowing or feeling that something exists
A2TOEICMoreback onto
US /bæk ˈɑntoʊ/
UK /bæk ˈɒntə/
- other
- To reverse a vehicle so it stops at a particular place.
B1Morecam
US /kæm/
UK /kæm/
- Noun
- Rotating or sliding piece in mechanical linkages
C1Morecarpet
US /ˈkɑ:rpɪt/
UK /ˈkɑ:pɪt/
- Noun (Countable/Uncountable)
- Colored floor covering made of wool, etc.
- Transitive Verb
- To cover a surface with, e.g. many flowers
B1Moreclip
US /klɪp/
UK /klɪp/
- Countable Noun
- A metal holder used for keeping things together
- Brief part of a television show or movie
- Transitive Verb
- To attach things together using a metal pin
- To cut a small section or piece out from something
B1Moreclutch
US /klʌtʃ/
UK /klʌtʃ/
- Transitive Verb
- To hold strongly in your hand
- To operate the clutch of a vehicle.
- Noun (Countable/Uncountable)
- A tight grasp or grip.
- A mechanical device that engages and disengages power transmission, especially in a vehicle.
B1Morecompact
US /kəmˈpækt/
UK /'kɒmpækt/
- Noun (Countable/Uncountable)
- Small case with face powder and a mirror
- A formal agreement or contract.
- Adjective
- Packed closely together
B1Moredepend
US /dɪˈpend/
UK /dɪˈpend/
- Verb (Transitive/Intransitive)
- Be controlled or determined by (someone/something)
- To rely on someone or something for support, help, or existence.
B1TOEICMoredepending on
US
UK
- Phrasal Verb
- To rely on for support (financial or emotional)
- Influenced or determined by.
- Preposition
- Subject to; contingent on
- Relying on someone or something for support or assistance.
A2Moredisconnect
US /ˌdɪskəˈnɛkt/
UK /ˌdɪskəˈnekt/
- Transitive Verb
- To separate something from something else
- Noun
- State of being separated from something else
B2Moredispenser
US /dɪˈspɛnsɚ/
UK /dɪˈspensə(r)/
- Noun
- Container used to prescribe amounts
B2Moredown with
US /daʊn wɪð/
UK /daun wið/
- Adjective
- Suffering from an illness.
- Agreeable to; in favor of.
- Interjection
- An expression of opposition to something.
A1Moredrain
US /dren/
UK /dreɪn/
- Noun (Countable/Uncountable)
- Hole or pipe that water, waste etc. flows into
- Something that depletes resources or energy.
- Transitive Verb
- To empty or remove liquid from
- To use up the energy/ money/power of something
B1Moredust
US /dʌst/
UK /dʌst/
- Transitive Verb
- To apply a fine powder to, e.g. sugar to a cake
- To wipe something to remove dirt
- Uncountable Noun
- Fine dry powder that builds up on surfaces
A2Moreencourage
US /ɛnˈkɚrɪdʒ, -ˈkʌr-/
UK /ɪn'kʌrɪdʒ/
- Transitive Verb
- To increase the chance of something happening
- To make someone more determined or confident
A2TOEICMoreflush
US /flʌʃ/
UK /flʌʃ/
- Noun
- Feeling that comes suddenly
- Verb (Transitive/Intransitive)
- To redden in the face due to emotion
B1Morefunction
US /ˈfʌŋkʃən/
UK /'fʌŋkʃn/
- Noun
- Social event, or party such as a wedding
- Mathematical operation used in calculations
- Intransitive Verb
- To serve a certain purpose or role
- To be operating, working or achieving its purpose
A2TOEICMoregear
US /ɡɪr/
UK /ɡɪə(r)/
- Verb (Transitive/Intransitive)
- To aim at or prepare yourself for something
- Noun (Countable/Uncountable)
- A speed selector connected to an engine
- Special clothes you use for a purpose
B1Moreharness
US /ˈhɑrnɪs/
UK /'hɑ:nɪs/
- Transitive Verb
- To capture the power of something
- To put a harness on (an animal).
- Noun
- Equipment used by horses to pull things
- A means of controlling and utilizing something, especially natural energy.
B1TOEICMoreintact
US /ɪn'tækt/
UK /ɪn'tækt/
- Adjective
- Being complete, without damaged or missing parts
B1Morelift
US /lɪft/
UK /lɪft/
- Noun
- Picking someone up in a car and taking to a place
- Machine carrying people up or down to other floors
- Transitive Verb
- To stop or cancel something, such as a rule
- To move something to higher position
A2Moreoff of
US /ɔf ʌv/
UK /ɔf ɔv/
- Preposition
- From a position on something; down from.
A1Morepanel
US /ˈpænəl/
UK /'pænl/
- Noun (Countable/Uncountable)
- Group who answer questions or give opinions
- Flat surface with controls and switches
- Transitive Verb
- To cover a wall with thin pieces of wood
A2TOEICMoreplastic
US /ˈplæstɪk/
UK /'plæstɪk/
- Uncountable Noun
- Stiff but usually flexible man-made material
- Adjective
- Being easily formed or shaped
A2Moreplug
US /plʌɡ/
UK /plʌg/
- Noun
- Wood, rubber or metal used to block a hole
- Thing on a wire to connect to electricity supply
- Transitive Verb
- To use an object to block a hole
- To promote or advertise a product
B1TOEICMorepress
US /prɛs/
UK /pres/
- Noun
- Machine using pressure to shape, flatten, squeeze
- General term for TV, radio, newspapers
- Transitive Verb
- To make clothes smooth using a heated iron; iron
- To repeatedly ask someone to do something
A2TOEICMoreprocedure
US /prəˈsidʒɚ/
UK /prəˈsi:dʒə(r)/
- Noun
- A medical operation
- Usual or standard steps taken to do something
B1TOEICMoreproperly
US /ˈprɑːpərli/
UK /ˈprɔpəlɪ/
- Adverb
- In an appropriate or correct manner
- In a way that is suitable or appropriate.
A2Morerear
US /rɪr/
UK /rɪə(r)/
- Noun
- Part of the human body that you sit on; buttocks
- Transitive Verb
- To care for a young animal, child into adulthood
A2TOEICMorerequire
US /rɪˈkwaɪr/
UK /rɪ'kwaɪə(r)/
- Transitive Verb
- To demand that someone does something
- To need to do something, to make it necessary
A2TOEICMorering up
US /rɪŋ ʌp/
UK /riŋ ʌp/
- Phrase
- Phrasal Verb
- To call someone on the telephone.
- To record a sale on a cash register.
A1Morerinse
US /rɪns/
UK /rɪns/
- Transitive Verb
- To wash off small amounts of dirt, soap suds, etc.
- To wash lightly
- Uncountable Noun
- Washing off small amount of dirt, soap suds, etc.
- A form of shampoo or conditioner
B2Moresecure
US /sɪˈkjʊr/
UK /sɪ'kjʊə(r)/
- Transitive Verb
- To get or achieve something with certainty
- To firmly attach something to something else
- Adjective
- Being attached to something tightly and surely
- (Place that is) locked, guarded and safe
A2TOEICMoreshaft
US /ʃæft/
UK /ʃɑ:ft/
- Transitive Verb
- To ruin the plans or prospects of others
- Noun
- Vertical, sloping passageway leading to a surface
B2Moreslide
US /slaɪd/
UK /slaɪd/
- Noun
- Part of machines that slides backward and forward
- Reduction in amount, price, quality
- Verb (Transitive/Intransitive)
- To pass or move smoothly and rapidly into or out
- To move smoothly and rapidly over a surface
A2Moresocket
US /ˈsɑkɪt/
UK /'sɒkɪt/
- Noun
- Area into which (e.g. a bone) will fit
- Point in the wall to plug in an electrical device
B2Morespill
US /spɪl/
UK /spɪl/
- Noun
- Accident when someone falls
- Act of allowing a fluid to escape
- Verb (Transitive/Intransitive)
- To come out of and spread beyond limits
- To tell secrets or let information escape
B1Morespill out
US /spɪl aʊt/
UK /spil aut/
- Phrasal Verb
- To flow or empty out, often in large quantities or in a disorderly manner.
B1Moresqueeze
US /skwiz/
UK /skwi:z/
- Noun (Countable/Uncountable)
- Amount of liquid from firmly pressing e.g. orange
- Act of putting pressure on, as to get liquid out
- Transitive Verb
- To force or threaten someone to give you something
- To strongly compress something to get liquid out
C1Moretilt
US /tɪlt/
UK /tɪlt/
- Verb (Transitive/Intransitive)
- To change to a newly preferred idea or opinion
- To move something away from the upright
- Noun
- Position in which one side is above the other
B2Moreturn off
US
UK
- Phrasal Verb
- To make someone feel negatively about something
A1Moretwist
US /twɪst/
UK /twɪst/
- Verb (Transitive/Intransitive)
- To turn something in a circular direction
- To turn in a curving direction e.g. road or path
- Noun (Countable/Uncountable)
- Turn or spiral curve in a path or road
- Bend or sudden change of direction
A2Morewiggle
US /ˈwɪɡəl/
UK /'wɪɡl/
- Intransitive Verb
- To move from side to side with short fast movement
C1More
Vocabulary
- turn off
- along with: In addition to; together with.
- spill out: To flow or empty out, often in large quantities or in a disorderly manner.
- ring up
- depending on: To rely on for support (financial or emotional)
- off of: From a position on something; down from.
- back onto: To reverse a vehicle so it stops at a particular place.
- down with: Suffering from an illness.
- properly: In an appropriate or correct manner
- aware: Knowing or feeling that something exists
- position: Person's opinion or attitude about something
- squeeze: Amount of liquid from firmly pressing e.g. orange
- align: To arrange (e.g. objects) in line with one another
- function: Social event, or party such as a wedding
- alert: Being aware and able to respond quickly
- drain: Hole or pipe that water, waste etc. flows into
- encourage: To increase the chance of something happening
- perform: To carry out an action well or successfully
- gear: To aim at or prepare yourself for something
- require: To demand that someone does something
- panel: Group who answer questions or give opinions
- intact: Being complete, without damaged or missing parts
- harness: To capture the power of something
- secure: To get or achieve something with certainty
- lift: Picking someone up in a car and taking to a place
- break: To create a new record e.g. running the 100m dash
- clip: A metal holder used for keeping things together
- press: Machine using pressure to shape, flatten, squeeze
- plug: Wood, rubber or metal used to block a hole
- plastic: Stiff but usually flexible man-made material
- flush: Feeling that comes suddenly
- carpet: Colored floor covering made of wool, etc.
- twist: To turn something in a circular direction
- depend: Be controlled or determined by (someone/something)
- compact: Small case with face powder and a mirror
- spill: Accident when someone falls
- attach: To be associated or connected with
- dust: To apply a fine powder to, e.g. sugar to a cake
- tilt: To change to a newly preferred idea or opinion
- clutch: To hold strongly in your hand
- procedure: A medical operation
- rinse: To wash off small amounts of dirt, soap suds, etc.
- place: To put someone in a particular type of situation
- rear: Part of the human body that you sit on; buttocks
- slide: Part of machines that slides backward and forward
- assembly: Process of putting the parts of something together
- turn: To become (a particular age)
- pull: Act of breathing in smoke, as from a pipe
- make: To arrange or prepare something e.g. dinner
- drive: A person's ambition and motivation to do something
- prepare: To make something ready for use
- hold: To agree to keep something for someone
- case: Container used to carry things, e.g. clothes
- remove: To get rid of something completely
- wiggle: To move from side to side with short fast movement
- appliance: Device designed to perform common household tasks
- begin: To do the first part of an action; to start
- spring: Coil of metal that lessens impact, e.g. on cars
- band: Group of people who work together e.g. play music
- shaft: To ruin the plans or prospects of others
- disconnect: To separate something from something else
- socket: Area into which (e.g. a bone) will fit
- dispenser: Container used to prescribe amounts
- cam: Rotating or sliding piece in mechanical linkages
Get the full experience in the app
Learn anywhere with detailed sentence and usage analysis
01:03
She took a brave step forward, leaving behind her comfort zone to chase her dreams.
Vocabulary
- brave
adj. Having courage
- comfort zone
phr. A familiar situation where one feels safe
Explanation
a brave step is a noun phrase, where brave is an adjective modifying the noun step, meaning "a courageous step".
forward is an adverb modifying step, meaning "ahead".
The whole phrase serves as the object, answering the "what" of took (verb) — she took a brave step forward.
Get the full experience in the app
Look up words anytime with pronunciation, part of speech, and usage
brave
US/brev/
UK/breɪv/
adj.Brave
v.t.To bravely face
A2 Elementary
Get the full experience in the app
Practice speaking anytime and get instant pronunciation feedback
Try this speaking exercise.
Try practicing with this sentence.
80
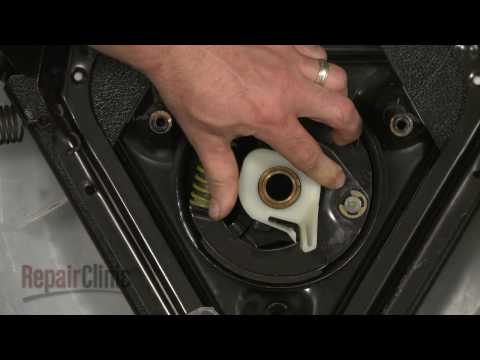
Clutch Band and Lining Repair Kit (part #285790) - Whirlpool/Kenmore Washer Repair
0
Why Why posted on 2013/04/01Is your washing machine making a funny noise? This video walks you through replacing the clutch band and lining kit with clear, step-by-step instructions, perfect for DIY homeowners! You'll pick up essential vocabulary for appliance repair and learn practical skills to fix your top-load washer yourself.
Learn this video on the APP!
The VoiceTube App has more in-depth practice for videos!