Placeholder Image

Subtitles section Play video

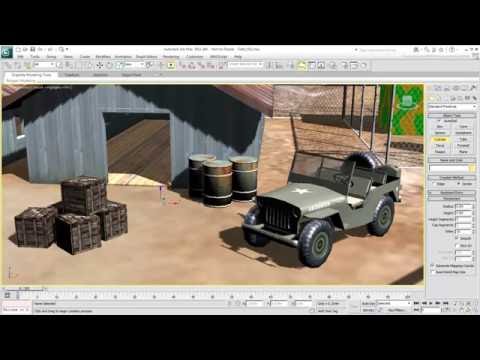
  • Let's take a look at object creation.

  • When you create objects, it's important to set the units of measurement you want to work with.

  • In the Customize menu, select Units Setup.

  • In this dialog, you can choose options that let you work in the metric system, with feet and inches, with a custom setup, or the default generic units.

  • This scene uses the metric system, which we'll leave active for now.

  • You can even toggle the lighting units between international and American systems.

  • But we'll not get into that right now, so cancel this dialog to exit.

  • Other settings you can work with are in Grid and Snap, which you can find by selecting Tools, Grids and Snaps, then Grid and Snap Settings.

  • You can also right-click on one of the Snap buttons.

  • And under the Home Grid tab, you can readjust the grid you see in the working area to fit your own standards.

  • This is something game companies are known to use to satisfy the units of their game engines.

  • It can also be used for architectural projects that follow a particular pattern.

  • We'll leave the default values as is.

  • Now that we've set the units and grids, let's see how to create simple shapes.

  • These are in the Create panel, under Geometry.

  • You can select different categories of geometry from this menu.

  • We'll stick with Standard Primitives for now.

  • You can create any of these objects in any viewport with a series of clicks and drags.

  • Some are simple enough, requiring a simple click and drag like Sphere and Teapot. Others require a bit more.

  • A box, for example, needs an initial click and drag for the base, and another mouse move and click to define its height.

  • The same is true for a cylinder.

  • A cone is built like a cylinder, with an additional mouse move and click to define the upper radius. And so on for other objects.

  • Let's undo that.

  • Using different viewports lets you create objects that face different directions.

  • For example, let's create a cylinder in the Perspective view, first with a click and drag to define its base, then by moving the mouse, and clicking once more to define the height.

  • Let's not worry about its size for now; we'll discuss object parameters later.

  • When you work in the Perspective view, you create a cylinder standing up, with its base lying flat on the ground.

  • You obtain similar results if you create a cylinder in the Top view.

  • However, when you create a cylinder in the Front view, notice that the cylinder is lying on its side.

  • That's because there are 3 default construction planes oriented in X, Y, and Z, and represented by the grids in the viewport.

  • So when you create a cylinder in the Top view, its base is lying on the grid you see in the Perspective viewport.

  • When you create a cylinder in the Front view, its base is lying on an invisible vertical grid, represented by this black line in the Top view.

  • The same is true if you create an object in the Left view.

  • The base of that cylinder is aligned with the third construction plane, represented by another black line in the Top view.

  • Using different construction planes is faster than having to build an object always standing up and reorienting it manually.

  • You can create more grids apart from the three default ones, but it's easier to use a feature called Auto Grid.

  • Let's say we want to build a cylinder, maybe representing a bottle, on top of one of those barrels.

  • Activate the type of object you want to create, then enable the Auto Grid option.

  • In the viewport, a tripod appears and updates as you move the cursor across surfaces.

  • This indicates the face orientation on the object, and by creating an object there, that individual face becomes the temporary construction plane for your cylinder.

  • It's good to use Auto Grid on a temporary basis, so make sure to turn it off when you're done with it.

  • Once you've created an object, it's good practice to go to the Modify panel to change its parameters.

  • Even though the Create panel displays parameters, switching to the Modify panel helps you avoid problems later.

  • You can change an object's name.

  • It's a good idea to give your objects names that are not too generic.

  • That way, when you're working in a scene with a lot of objects, you will be able to find each one more easily.

  • For example, we can rename this cylinder "Bottle_001".

  • Adding a number after the name is useful if the object is the first in a series.

  • If you start making duplicates of it, they will be automatically incremented 002, 003, and so on.

  • The color swatch next to the name displays the object's wire color.

  • This color is generated at random, and sometimes is a little hard to see against the background.

  • You can change the wire color, but stay away from white and red; these would conflict with object and sub-object selection later on.

  • For now, the wire color displays on the object in both Shaded and Wireframe views, but that will eventually change when you apply a material to the object.

  • At that point, the wire color will only show in the Wireframe views or when Edged Faces mode is active.

  • In most cases, you don't need to worry about the object's exact size or other properties when you're creating it.

  • You create it first, and then you go to the Modify panel to adjust its base radius, height, and other parameters.

  • For example, you can change the Cylinder parameters in a number of ways.

  • By clicking in a field and specifying a value, let's say for the Radius,

  • by using the spinner arrows incrementally, in this case to change the height of the object,

  • or by clicking and dragging on the spinners directly.

  • Here's a tip about numerical values:

  • You can set them down to their minimum possible value by right-clicking the spinners.

  • For example, right-clicking the Radius spinner brings the value down to zero, making the cylinder disappear.

  • Let's undo that.

  • However, right-clicking the number of Sides brings the value down to 3, which is the minimum value for the level of detail.

Let's take a look at object creation.

Subtitles and vocabulary

Click the word to look it up Click the word to find further inforamtion about it