Subtitles & vocabulary
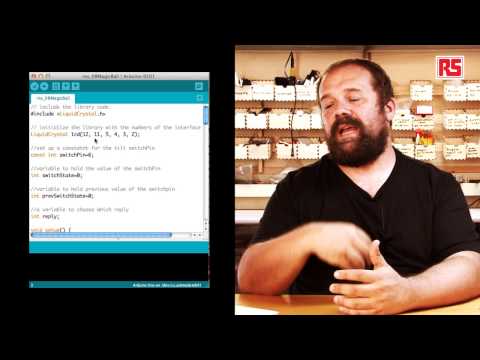
Arduino Video Tutorial 07- Crystal Ball (Magic 8-Ball)
00
Chuan Zhe Lin posted on 2013/05/20Save
Video vocabulary

ball
US /bɔl/
・
UK /bɔ:l/
- Noun (Countable/Uncountable)
- Large dance where people dress formally
- Small round object often used in a game or sport
A1
More answer
US /ˈænsɚ/
・
UK /'ɑ:nsə(r)/
- Verb (Transitive/Intransitive)
- To reply to a question someone asks
- To solve a test question or a problem
- Noun
- Reply to a question someone asks
- Solution to a problem or test question
A1
More board
US /bɔrd, bord/
・
UK /bɔ:d/
- Noun (Countable/Uncountable)
- Surface for posting or showing information
- Group of persons who direct an organization
- Verb (Transitive/Intransitive)
- To enter a ship, plane, or other vehicle
- To pay money to live in someone's house; lodge
A1TOEIC
More start
US /stɑrt/
・
UK /stɑ:t/
- Noun (Countable/Uncountable)
- First time or place that a thing exists; beginning
- Beginning of something in place or time
- Verb (Transitive/Intransitive)
- To do, be or happen for the first time; begin
A1
More Use Energy
Unlock Vocabulary
Unlock pronunciation, explanations, and filters

