Subtitles & vocabulary
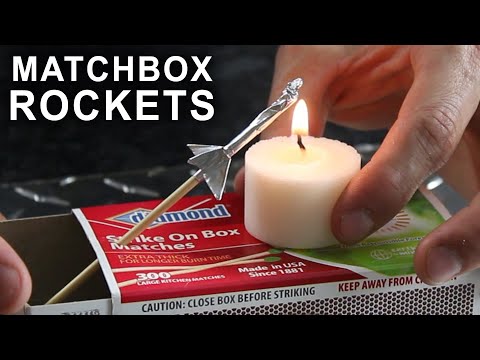
How To Make a Matchbox Rocket Launching Kit
00
何紹愷 posted on 2015/02/10Save
Video vocabulary

head
US /hɛd/
・
UK /hed/
- Verb (Transitive/Intransitive)
- To hit a ball with your head in a game
- To be first or at the front or top (e.g. a list)
- Countable Noun
- Counter for the number of cattle
- Leader or person with the greatest authority
A1TOEIC
More work
US /wɚk/
・
UK /wɜ:k/
- Noun (Countable/Uncountable)
- The product of some artistic or literary endeavor
- Everything created by an author, artist, musician
- Verb (Transitive/Intransitive)
- To bring into a specific state of success
- To be functioning properly, e.g. a car
A1TOEIC
More point
US /pɔɪnt/
・
UK /pɔɪnt/
- Noun (Countable/Uncountable)
- An item to be discussed
- Small spot or dot
- Intransitive Verb
- To face a certain direction, e.g. north
A1TOEIC
More project
US /prəˈdʒɛkt/
・
UK /prəˈdʒekt/
- Verb (Transitive/Intransitive)
- To predict what will happen in the future
- To show something on a screen using light
- Noun (Countable/Uncountable)
- A planned piece of work for specific purpose
- Group of homes built by government for poor people
A1TOEIC
More Use Energy
Unlock Vocabulary
Unlock pronunciation, explanations, and filters

