Placeholder Image

Subtitles section Play video

  • Hello I'm Gavin Hoey and your watching

  • Adorama TV. Brought to you bt Adorama the camera store that has

  • everything for us photographers. And your watching another fifteen-minute

  • photo challenge. Adorama TV presents

  • take and make great photography with Gavin Hoey

  • where you'll learn how to take stunning photos and then polished them

  • in post-production. So your joining here in New York. I'm in New York

  • I'm gonna spend 15 minutes wandering around this little small area

  • to see what photos we can take. behind me is the flat iron building

  • and hopefully we'll find some good shots of that and the park across the way here

  • so

  • let's get going. okay so for my first shot

  • well I'm gonna do the clock here it says everything about the place

  • Fifth avenue building we're gonna have to be the flat iron behind it

  • okay let's come in here I'm gonna do a reasonably tight close shot I think as

  • well because

  • well I think it look's good so there is a bit of a problem with the the lamp shade

  • coming through the streetlight but there's not alot I can do about that it's just

  • just there's isn't it will have to live with that but what I will do is try make

  • sure the clock

  • is between the two buildings so it

  • fills that gap in the sky good but I reckon is a really wide show in here as

  • well so

  • just come down a little bit lower. get a wide shot

  • now looking back at the camera I can see it look a bit shadowy

  • on the clock but not a lot I can do about that

  • that something will have to try and fix in Photoshop and as we have only got

  • fifteen minutes

  • lets go on and take more pictures

  • okay so I think there is a panno here

  • just to really establish the scene just to give you a feel of how much there is

  • here to take in its incredible

  • so let's grab my camera, now pano's if you wanna see really detailed

  • information how to shot panoramas

  • go check out Adorama TV's Learning Center a check out my very

  • first video no my second video. Video 102

  • were I do Pano's in more detail but for a very quick overview

  • I'm just gonna start in aperture priority mode I'm gonna choose

  • f8 as my aperture and I'm gonna take a meter reading

  • which is telling me at 200th of a second ISO 200

  • f8. I'll dial those numbers in to manual

  • so all of my panno shots have the same settings, turn my camera on it's side so I'm in

  • portrait format

  • and away we go. So doesn't matter whether you start left to right

  • but the first picture, picture of my hand so I know that's the beginning in my pano

  • and around we go

  • one, two , three, four ,

  • five , six. wait for the lorry to go through

  • Sevan. There we go. okay so there's my little pano

  • and I'll stitch that together in Photoshop we should have a much more dynamic shot

  • with that huge 180 degree

  • field of view

  • random shots but

  • it's very New York

  • well it's a bit of a cliche but

  • one thing you notice when you're in New York is the sheer number of yellow cabs

  • well sort of orangy yellow cabs. I've got to get a picture of those

  • and I think just over here is where I'm gonna do it

  • don't forget to check out Adorama's latest contest

  • and your chance to win amazing prizes

  • so we've got cars taxis whizzing past me cabs

  • whizzing past me all the time lets get a shot now first of all I need to come

  • of manual and back into aperture priority mode so

  • I'm gonna choose a setting that's gonna give me a shutter speed

  • thats gonna give that motion in fact I'm a work in shutter priority mode so

  • on my Canon 60d that the TV setting and I'm gonna dial down my shutter speed to

  • well I dunno

  • I'm guessing about a 30th of a second should give me some motion blur cuz I

  • want these cabs to be

  • slightly blurred to give that terror that you're about to get run over

  • cos that's what I've got every time I stepped into the road since I've been

  • here

  • okay so lets just take a quick shot. There we go so

  • ok brilliant so we've got a couple of great shots there let's go find somewhere else to take

  • some more pictures before we run out of time

  • so

  • we just come across to the park right across from the Flat iron Building and

  • there's all sorts of great little shots

  • in here some people, some objects but these things

  • these have really caught my eye and their a little bit of actually i dunno what way are

  • everybody's been looking under neath so I'm gonna just

  • have a sneaky look under there see if it's a good photo

  • you can see what I can see if you could see if you could see this you'd you'd be

  • grabbing your camera

  • you be taking exactly the same shot that I'm gonna take which is

  • a brilliant self portrait

  • well it's a self portrait that's pretty

  • incredible thats just great fun so couple things I'm gonna look for here

  • i'm looking at a shot that seems to have a massive depth the field so I'm gonna

  • dial up my

  • aperture to f8 it's one of those depth of field things where if you're not quite

  • sure f8

  • is a great place to be because just it just generally doesn't matter

  • but F8 is giving me a shutter speed that's a little bit on the slow side

  • so I'm gonna increase my ISO to compensate

  • all the way up to 800 ISO

  • 800 ISO yeah i mean that that looks , that's incredible

  • I really love that, that's great

  • right okay so well time's running out fifteen minutes a pretty much done

  • and

  • I'm no doubt gonna stay here for ages more taking a few pictures but for this

  • challenge

  • I want one more shot looking up fifth avenue because as I look out there

  • I can see a rather tall building, it's the Empire State Building and I've gotta get

  • a picture that is one of those pictures you gotta do

  • I've got to do this without getting run over by cabs

  • wish me luck, here we go

  • look there's a gap in the traffic

  • I'll be honest is not my best picture but I'm a tourist

  • and I'm enjoying myself here's and it's one of the must have shots

  • and that's one of my little memories from New York

  • but when you look a little bit closer sometimes you see things that

  • the touristy shot will miss, So I'm just gonna

  • go in a little bit closer I'm gonna go with a nice

  • wide aperture so F4

  • and I'm gonna get this shot

  • bet you didn't see that one

  • so there you go fifteen minutes have come and gone

  • I'm still in one piece and I have been run over

  • which is fabulous but what we gonna do now is to get these pictures

  • back onto my computer and we'll see what we can do with them inside of

  • Photoshop

  • I'm gonna do that right now

  • well it was absolutely freezing in New York so I'm back in my office and

  • warming up quite nicely

  • and I had chance to look at the pictures the one I want to edit

  • is the first shot it's a great raw file with bags of potential

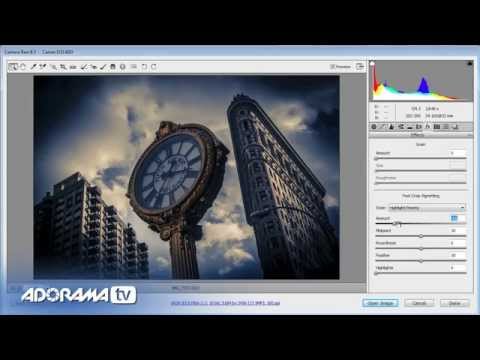
  • it's the picture of the clock with Fifth Avenue in there

  • the Flatiron Building behind and I'm gonna stop by deliberately

  • under exposing the image now if I'd have done this to the picture in camera if

  • either deliberately or accidentally under exposed the image

  • I'd have looked at it and thought I've messed that one up and

  • technically I have but were gonna use raw to really maximize

  • the potential in the picture we're gonna push this as far as I'm comfortable

  • to take the raw file which is possibly a little bit too far for some people but

  • that's okay

  • it's my picture so what I'm gonna do next is to say okay more highlighted

  • detail please by reducing the highlights but then open up the shadows

  • by increasing the shadow slider so I get something out of the shadows to.

  • little bit under exposed there's a bit of a hint of a gap there on the the histogram

  • so

  • let's just bring up the whites just to fill in that end, now

  • obviously this picture needs clarity say obviously I do use clarity lot but

  • these pictures got some great texture and that's what clarity really picks up on

  • now color this picture could work as a black and white

  • I think, or it could work a color image and in fact if I increase my saturation

  • the colors really hold up well so another nice little tip is if you're

  • saturation can go really high and you don't fall down

  • then you can sort out your colors and just mute them back a little bit

  • by pulling back the vibrance like so now if you choose to

  • go down the color route or and the black and white route and want to find out

  • more about how to be black and white work

  • then check out the Adorama Learning Center has a brilliant tips and

  • techniques

  • on shooting in black and white and editing your pictures in black and white

  • okay now I like that I like the hint of color

  • but also the hint of monochrome but the monochrome gives me the ability to do a

  • few things

  • for example I can jump into split toning and I can split tone my

  • image and I'm gonna do it by adding 50 to the highlights

  • 230 to the shadows, let's start with the highlight color

  • I chosen my color as warm tone by adding fifty

  • but the amount of warm tone is governed by the saturation slider

  • and you can see how it picks up on that black and white sky that we created

  • by reducing vibrance and put a nice warmth into the

  • the highlights in the sky same with the shadows

  • when I increase the saturation on the shadows were putting some blue

  • into the shadowy areas in the picture and thats split toning

  • different tone in the highlights and the shadows okay while we're here we're

  • gonna come into the effects as well

  • and put a little bit of post crop vignetting just to darken the edges

  • and that will make that center feel darker notice I said feel

  • doesn't actually change the center just feels like it does

  • well one of the great things about the raw editor in Lightroom and Photoshop

  • is you don't have to make

  • just global changes that changes to

  • all of the picture equally you can make local changes as well

  • so you can be much more selective about what you do

  • to small parts of the picture now here in Photoshop

  • it's the adjustment brush its on the Options bar on the top

  • so let's go grab that and I'm gonna increase my exposure

  • by about a stop, we'll make my brush a little bit bigger

  • and we'll just paint an extra stopof light over the clock face

  • because it was feeling a little bit dark and a little bit gloomy

  • lets make the brush a little bit smaller and I'll just tidy up. Put more light

  • down here too now you don't have to stop there you can have as many these brushes

  • you like

  • so I'm gonna get another new brush and this time what I'm gonna do

  • is I'm going to increase the clarity and I'm also gonna increase the contrast

  • and we're just gonna paint over the face of the clock and you will see how much

  • cuts through that haze and gives me a much clearer picture of

  • the clock face finally I'm also gonna add some temperature to the area

  • just to warm it up a little bit so it's not a cold looking

  • clock face it has some warmth in there and there you go

  • that's it that's my final picture completed

  • now if you enjoyed this video don't forget to click on the subscribe button

  • to keep getting more videos from myself

  • and the other amazing presenters here on Adorama TV

  • I'm Gavin Hoey thanks for watching

  • Do you want great-looking prints at low-cost? be sure to visit our

  • easy to use online printing service Adorama

  • pics has professionals to treat your images with the utmost care that you can

  • count on

  • for a quick turnaround on photos cards for albums

  • use adoramapix.com

Hello I'm Gavin Hoey and your watching

Subtitles and vocabulary

Click the word to look it up Click the word to find further inforamtion about it