Placeholder Image

Subtitles section Play video

  • In this video

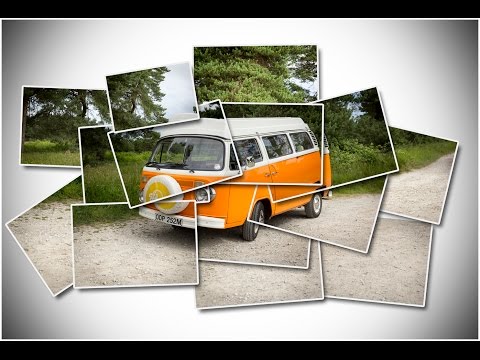
  • I borrow a classic VW Camper Van for a 15-minute

  • photo challenge. Adorama TV presents

  • Take and Make Great Photography with Gavin Hoey.

  • Where you'll learn how to take stunning photos and polish them

  • in post-production. Hello I'm Gavin Hoey and your watching Adorama TV brought to you by Adorama.

  • The camera store that has everything for us photographer's, and today

  • well I've got a VW camper van and where gonna do a fifteen-minute photo challenge.

  • Now it's a classic, it's a 1979 VW camper van,

  • bright orange. Yeah there's got to be

  • some good shots. But what do you do with something like this? Well we're in

  • a beautiful place. We're in the Ashdown Forest. I reckon the first thing to do

  • is a nice simple

  • panorama. So I got my Canon 24-105mm lens on

  • a Canon 60D. I can't get everything in some data back up a little

  • bit.

  • So from back here and get a a pretty good view. Nice wide view, this will be great for

  • panorama.

  • Let's start by taking a picture of my hand, so I know the next sequence of pictures

  • are all connected together

  • as a panorama, and then in aperture-priority mode.

  • I'm gonna choose f8 as my aperture, cuz that'll do.

  • It's one of those ones where the apertures less important. I'll take a meter reading and my

  • meter is

  • telling me, well if we meter for a bit of sky as well. 250th of a second.

  • F8, so I'll change to manual mode. Dial those exact settings in, 250th of a second,

  • F8, ISO 100. They're locked in so

  • every picture in my panorama has the same exposure. Okay

  • does't matter wether you start left or right. Just take a picture.

  • Make sure they overlap, turn the camera

  • take the next shot, turn the camera

  • take the next shot, and around we go trying to stay nice and level

  • making sure every picture overlaps the last, and we'll go nice and wide.

  • To really give this a nice feeling,

  • that it's in the landscape. Now I'm thinking of multiple images. Let's do a

  • joiner or a montage as well, because I think this will work really well as a montage. Technique is

  • exactly the same as a panorama,

  • as is the Photoshop bit, but we'll get to that in a bit. What I'm gonna do is switch to

  • aperture priority mode, I'll go for F8 again as my aperture,

  • and we'll take a nice general exposure for the scene, and

  • if I just get the camper van in with less sky, and the lighting just changed.

  • My exposer say 320th of a second, F8.

  • So again manual exposure, lock those numbers in.

  • 320th, F8. I'm gonna zoom in

  • to about 70 millimetres, and I'll take all the shots at the same zoom settings.

  • So even the zoom is gonna stay constant this time around.

  • Okay, and I'm just gonna take lots of little bits of

  • the camper van. So we're gonna take lots of shots that

  • overlap. I'm gonna keep twisting the camera around as well.

  • Make sure we get everything included including the surrounding area.

  • I think one of the great things about VW campers is the front looks so happy, doesn't it?

  • It's sort of a smiley face.

  • Yeah let's see if we can get a few detailed shots of that because I just love this

  • really

  • strong orange color that we've got here, with the chrome.

  • Yeah I think a few close-ups could work well.

  • So I'm gonna switch back to aperture-priority mode, that's important.

  • I'm gonna stay with F8 because thats a nice middle-of-the-road depth of field

  • and shouldn't get my shutter speed to low, 1/60th of a second. I might just

  • bump up my ISO

  • to 200. Doubling my ISO doubles my shutter speed.

  • Give's me a sharper shot. Yeah I just love that simple graphic look and sometimes it's

  • the simple graphic images

  • that work well. So let's come around to the side find some more. So things like the

  • the door handle. Let's grab a shot of that,

  • that's got nice lovely clean colours. One of the things I often forget is to take

  • picture's both in

  • landscape and portrait format. So let's do in both.

  • We can choose which we prefer later.

  • More handles. I

  • love these, am I love these.

  • Come on it's 1979 they didn't build doors the way we do now but that works

  • with a bit of a slam.

  • We got the two door handles here, there's got to be a shot here, a bit of symmetry.

  • Symmetry is always good. We like a bit of symmetry.

  • Okay that's great. Okay so

  • almost out of time, just time to dive inside and do a couple of

  • inside shots. So let's get this open.

  • Actually I'll tell you what, there

  • is a panorama here as well. Yeah hang on a second.

  • Cup of tea?

  • This is a brilliant panorama, I'm gonna have to back up to do this. Okay,

  • there I reckon, maybe even a closer.

  • It's gonna be one of those fiddly one's, but just here. One other things about shooting a

  • panorama is the way it bows and twists things.

  • So let's set up a panorama to distort the shape of this.

  • Aperture-priority mode, F8.

  • Take a meter reading, ISO 200 cuz it's dark in there.

  • 320th of a second. Manual exposer , 320 , F8.

  • Same settings, away we go. Take a pictures of my hand.

  • And here we go so, overlapping the shots.

  • Starting there , one , two

  • three , four , five.

  • Brilliant okay and that should stitch together and give this beautiful curve

  • and distortion to the shape of this. Which give that sort of fish eye effect,

  • without a fish eye, lets go inside.

  • It's a kinda cozy in here isn't it but it's still rather nice, and this has

  • been fitted out so it's got new and old stuff in it as well, but

  • I've been driving is for a little bit. One of the thing's that really caught

  • my eye and I wanted to photograph

  • is the fuel gauge, and fuel gauge,

  • grab the key, has got

  • a lovely vintage retro feel to it

  • It come with about six keys for thi. Remember these days when

  • the cars had six keys to do everything.

  • Goodness, no not that key. Not that key.

  • Fifteen minutes juts trying to find the right key. There you go,

  • That key, and the fuel gauges got a little kinda

  • pointy finger, just fantastic.

  • So it's gonna take 15 minutes for the fuel gauge to get

  • up.

  • Also trying to get in here without reflections is gonna be a challenge too.

  • So I'm gonna need to find an angle. Reflections everywhere. I might have to be on the

  • other seat to do this

  • Love that little vintage fuel gauge.

  • Well there we go 15 minutes has come and gone.

  • Now if you wanna find out more about general photography hints and tips

  • don't forget to check out the Adorama Learning Center, but what I gotta do is

  • to get this

  • camper van back to it owners. However for the purpose of this video,

  • We're gonna edit my favorite picture in Photoshop right now.

  • Don't forget to check out Adorama's latest contest and your chance to win

  • amazing prizes.

  • That VW camper van was a real experience,

  • driving experience, a little bit challenging.

  • Photography wise no problem's at all. Some really great photos.

  • Now I'm gonna make a joiner image. I'm gonna do it in Photoshop because it's

  • really straightforward to do.

  • So first things first I went through the pictures and I picked out

  • my joyner images. I'll click on the first one

  • I'll hold hold SHIFT, click on the last one and drag them from Explorer

  • and drop them all into Photoshop. Now because these are raw files they

  • open up

  • in Adobe Camera Raw. I'll press the select

  • all button and then I'm gonna press the auto button.

  • Now that will analyze each and every picture and give it all a slight

  • variation based on, well getting automatically correct.

  • Now you'll notice that happened because each of these boxes is blank.

  • If I just go through the individual images one at a time ,you'll see that the exposure

  • and all of the sliders jus randomly change from picture to picture.

  • Okay let's click select all though and then we'll click on

  • open images. Now why would I want that especially considering I went to

  • all the trouble getting exposure right at the photography stage.

  • Well if it turned out I actually wanted the exposure right to make it

  • seamless montage. It's much easier to do that in camera.

  • Much harder to do it for 14 images in Photoshop.

  • Photoshop can randomized the exposure slightly and it can do that really

  • quickly so,

  • that's what I let Photoshop do because that's what it does best. Okay so there

  • we are that's

  • all of the Images open inside Photoshop. So to join them together

  • I'm gonna go to File, and then I'm gonna choose automate,

  • and Photo Merge which is just dropped off the bottom of the video ,but trust me

  • its there. In photo merge I will choose the collage layout,

  • and most importantly un tick blend

  • images together. Open the files that are already open, that's the picture's that

  • make my joiner and then click

  • ok. And of it goes, so it'll gathers together.

  • Look for the overlaps and joins them no matter how small,

  • and then try and line everything up. Now because some of the overlaps and join's are

  • really small

  • its actually gonna fail to line things up absolutely perfectly.

  • But that's all part of the joiner experience.

  • There we go, so there is my joiner and you can see they are all in

  • slightly different random positions.

  • Now of course you can go through each and every layer and randomize it even more

  • if you want to.

  • That works fine or you can simply say yep that's okay

  • and what I'm gonna do is go to layer. Layer style

  • and we'll add in a stroke for a border on each layer.

  • I'll change the color for my border to be well white but not quite white. So

  • let's have the hue as 0,

  • saturation 0, but the brightness at 96.

  • So it's just off white. Then I'll change the size so it's about

  • 30 pixels depends on the the size of your images you might need to go bigger

  • or smaller.

  • Position is on the outside and then we'll jump down to drop shadow.

  • I like drop shadow. The reason I like drop shadow is because you can position it

  • just by clicking on the image

  • and dragging the shadow around. Which is a really handy feature when you know

  • it's there.

  • We want the the shadow to go down there in the bottom right corner.

  • I'll just increase the size just to blur it out and drop the opacity back slightly.

  • Then I can click the OK button and that will apply my layer style.

  • Now I've done that to one image but now I need to. do it to lots of images

  • There is a really neat shortcut. Come to the word 'EFFECTS'

  • on the layer. Right click it and choose

  • copy layer style. Then go down to the very bottom of the layer panel

  • Find a bottom layer hold the Shift key and click it.

  • Now they've all become selected, and all I need to do right click on any of them it,

  • it doesn't matter which one,

  • and click not on the layer itself but the wording next to it.

  • And we can find paste layer style,

  • and it paste's them on. There you go, so there is

  • my joiner. We could jiggle these around a little bit by selecting

  • an individual layer, getting the move tool

  • and just moving them about, or you can also use a bit of free transformed just to

  • the spin them around and that could be useful just a really mix things up a

  • little bit.

  • It doesn't take long to do that can create your joiner your

  • montage,

  • and just give it a slight randomness which these things really lend themselves to.

  • There you go so when your happy all you need to do then it just

  • add in a brand new background and that is your joiner

  • picture completed. Now if you've enjoyed this video and you want to see

  • other videos by the other amazing presenters here on Adorama TV

  • you know what you got to do. You know what you've got to do, you've got to click on the subscribe button.

  • I'm Gavin Hoey thanks for watching.

  • Do you want great-looking print's at low-cost? Be sure to visit our

  • easy to use online printing service. Adorama

  • pics has professionals to treat your images with the utmost care that you can

  • count on

  • for quick turnaround on photos cards or albums

  • use adoramapix.com

In this video

Subtitles and vocabulary

Click the word to look it up Click the word to find further inforamtion about it